1. Draw at size: capsules, clean lines, and why not to shrink
Back to the tutorial. Code: stage0.py (the reduction), fig.py (the rasterizer), render.reduce_idx and render.sprite_ss (the experiment that lost), in ~/work/pixelart-studies/elements/people/src/.
Start by shrinking a master
Before I drew a single figure I wanted to know what survives when a great small figure gets smaller. Bruegel's Harvesters is full of figures 50–75 px tall in a 1280 px reproduction, each reading instantly by its task. I cropped three (the mower, the kneeling binder, the woman bent double over a sheaf), quantized each to 10 colours with a tiny k-means, and area-reduced them:
def kmeans(px, k, it=20, seed=0):
    rng = np.random.default_rng(seed)
    c = px[rng.choice(len(px), k, replace=False)].astype(float)
    for _ in range(it):
        d = ((px[:, None] - c[None]) ** 2).sum(-1)
        a = d.argmin(1)
        for j in range(k):
            if (a == j).any():
                c[j] = px[a == j].mean(0)
    return c, a

def reduce(img, h):
    im = Image.fromarray(img)
    w = max(1, round(img.shape[1] * h / img.shape[0]))
    return np.asarray(im.resize((w, h), Image.BOX))      # BOX = true area averaging

for f in (0.5, 0.25, 0.125):
    r = quant(reduce(b, max(4, int(b.shape[0] * f))), 8)
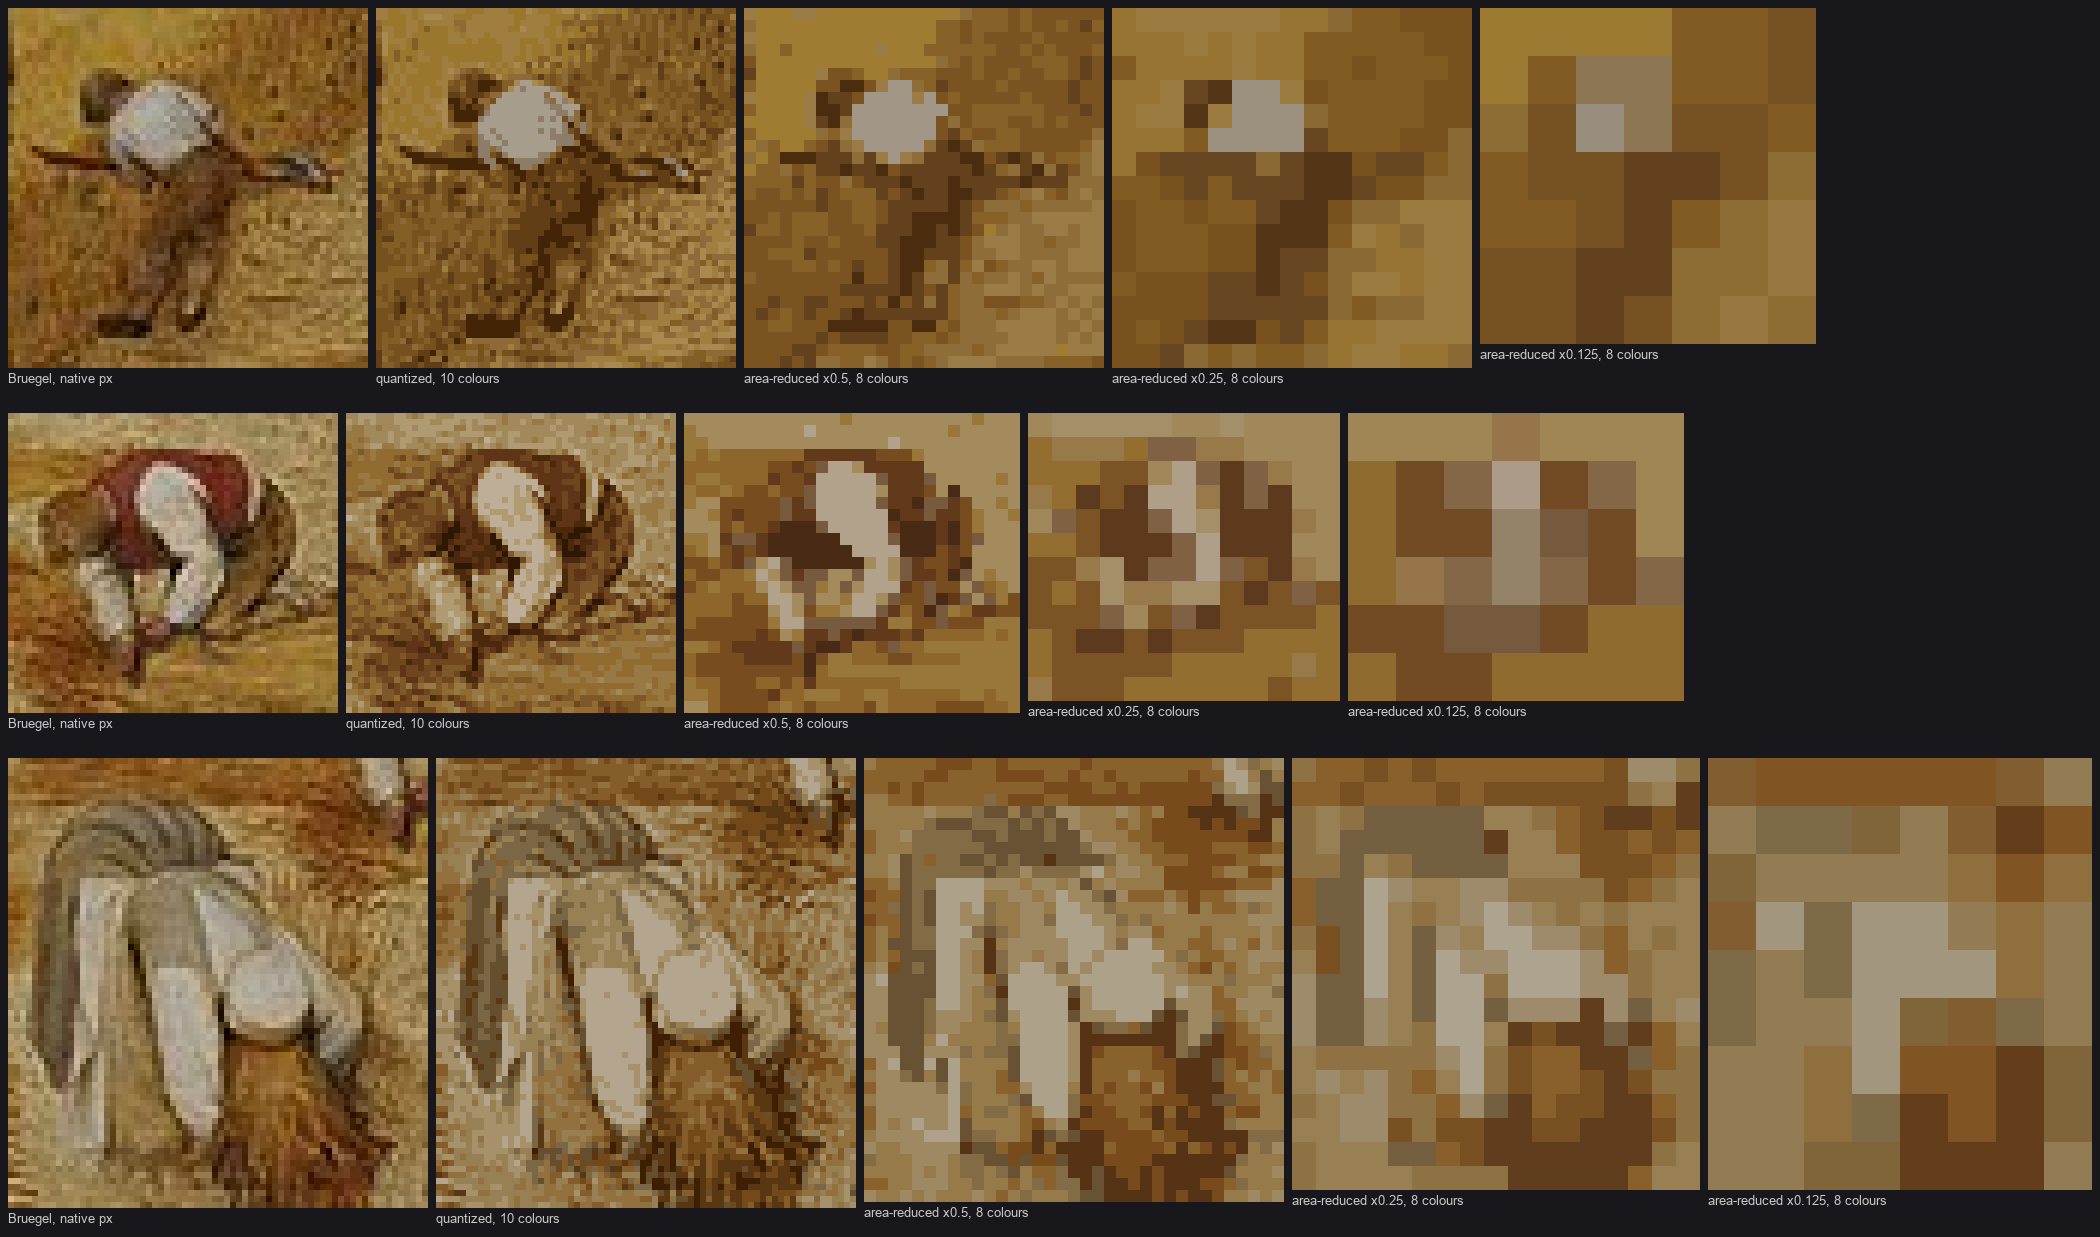
study. Native, quantized, ×0.5, ×0.25, ×0.125. By ×0.25 (about 12 px) only the white shirt survives. By ×0.125 the figures have dissolved into the stubble.
Do this for your own subject before anything else. It takes ten minutes and tells you what your small figures must be made of:
- One value extreme carries a small figure: the lightest or darkest mass near it (Bruegel's white shirt). For our people that's black hair, a cream blanket, a pale hat. Bare skin and bark are mid-values, so a summer figure on sand is the hard case, and the rules on later pages exist mostly for it.
- Narrow forms don't survive averaging. The scythe is a crisp line at native size and noise after. They have to be drawn.
- The ground near a small figure has to be calm. Bruegel's stubble is two close golds and a few strokes.
- There is always a dark under the figure.
A camera averages. That's why a photo of a person at 6 px is a smudge, and why the engine must not work like a camera.
The rasterizer: capsules at the target resolution
Everything in a figure (limb segments, torso pieces, the head, hair, garments, props) is a capsule: two end points in world units, a radius at each end, a profile, a material. fig.Canvas.draw projects the axis with an orthographic camera at elevation e, then for every pixel in the bounding box finds the nearest point on the axis, the radius there, whether the pixel is inside, its depth on the capsule's surface, and its normal:
t = ((px - A[0]) * d[0] + (py - A[1]) * d[1]) / L2          # position along the axis
tc = np.clip(t, 0, 1)
if prim.prof == 'spindle':                                     # fat in the middle (fish, blades)
    r = r0 + (r1 - r0) * np.sin(np.pi * tc) ** 0.7
elif prim.prof == 'bell':                                      # flares toward the far end (capes)
    r = r0 + (r1 - r0) * tc ** 0.7
else:
    r = r0 + (r1 - r0) * tc
cx, cy = A[0] + d[0] * tc, A[1] + d[1] * tc
dist2 = (px - cx) ** 2 + (py - cy) ** 2
inside = dist2 <= (r + prim.bias) ** 2
zs = np.sqrt(np.maximum(np.maximum(r, 0.5) ** 2 - dist2, 0))
depth = A[2] + (B[2] - A[2]) * tc + zs + prim.zb              # z-buffer; zb is a per-part bias
The pixel's radius is floored per part (max(prim.r0 * scale, prim.minw)). That floor is how the small-size rules in how-to 5 reach the rasterizer. Every pixel that wins the z-test writes five buffers:
- the material and a default step;
- depth;
- world normal;
- which part it is;
- which figure it belongs to.
Shading happens later, on the whole canvas at once.
The camera is two lines, and the whole study hangs off them: screen-up is y·cos e − z·sin e, depth is z·cos e + y·sin e. Because depth is kept per pixel, every pixel's world position can be recovered later. That's what makes firelight (how-to 6) and the water mirror (how-to 7) cheap.
Narrow forms are clean lines
When a capsule's radius is under ~0.75 px, coverage alone gives a broken dotted line: some pixels' centres fall inside and some don't. So thin capsules also draw their axis as a Bresenham run:
if prim.thin and rm < 0.75:
    for (lx, ly) in bresenham(A[0], A[1], B[0], B[1]):
        thin_mask[ly - y0, lx - x0] = True
    inside |= thin_mask
This is the studio's clean-runs rule (1:1, 2:1, 4-4-4 steps for anything narrow) applied to a 15 ft salmon spear, a digging stick, a paddle shaft, a 12 px person's arm, a weir stake.
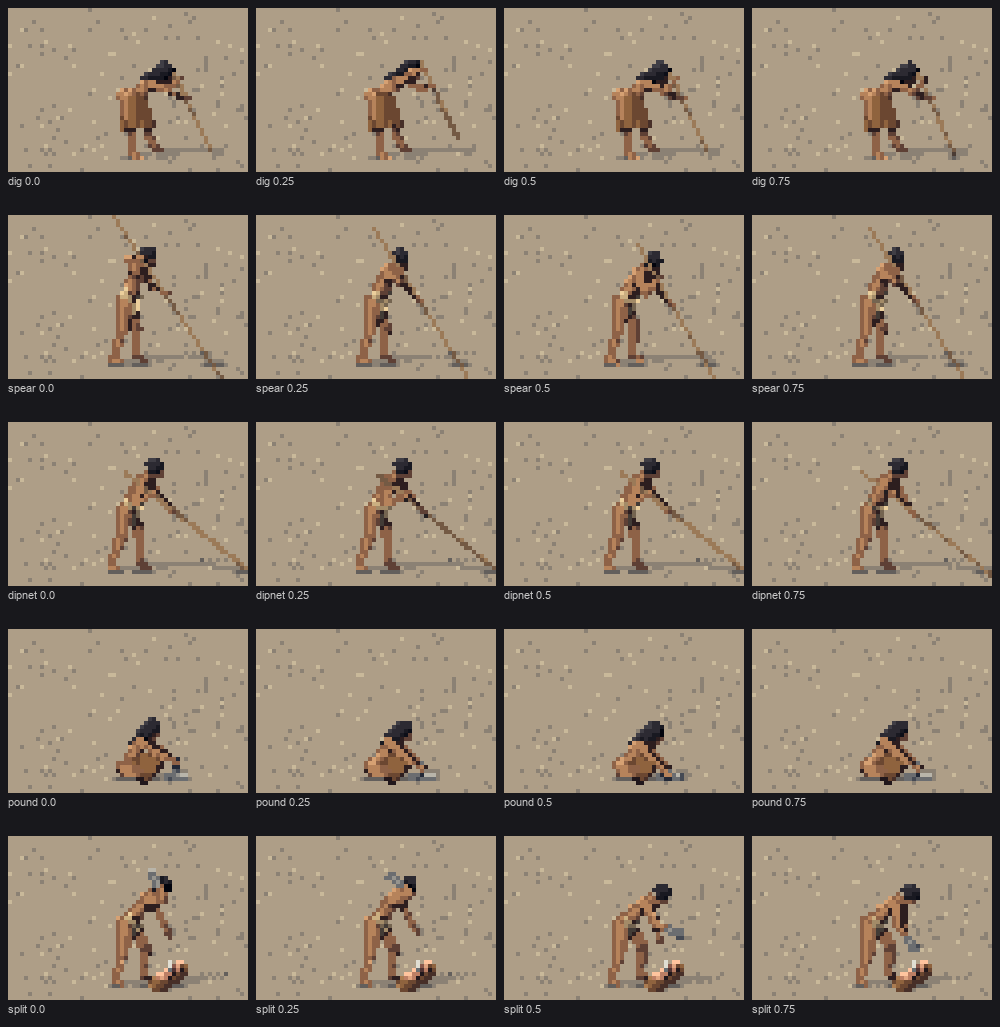
fig. Dig, spear, dipnet, pound and split, four phases each, at 32 px. Every pole is a single clean run.
A debug that earns its keep: who won each pixel
The most useful debug of the study was printing the part tag that won each pixel of a 6 px woman:
sc = sprite(dict(activity='stand', facing=0), 6, pad=4)
ys, xs = np.nonzero(sc.cv.idx > 0)
sub = sc.cv.part[ys.min():ys.max()+1, xs.min():xs.max()+1]
for row in sub:
    print(' '.join(f'{sc.cv.tags.get(p, ".")[:6]:>6}' for p in row))
     .   hair
hairlo  uarmR
hairlo  uarmR
     .  farmR
     . thighR
     .  shinR
     .  footR
She was made entirely of hair and one arm. Her torso and skirt lost the z-test to the arm in front of them in every pixel. The skirt needed a depth bias (zb=0.8 on garments) and a pixel floor. At 6 px you can't guess which part wins each of the 12 pixels; print them.
The experiment that lost: render big, reduce clever
The obvious alternative is to render at 4× and reduce, choosing each small pixel's material as a salience-weighted mode, with hair, wood and stone counting more than skin so heads and tools survive:
SALIENCE = {'HAIR': 2.3, 'WOOD': 2.2, 'STONE': 1.8, 'NET': 2.0, 'STRAW': 1.3, 'BARKT': 1.2, 'WOOL': 1.3, ...}
score[..., mi] = sel.sum(-1) * wgt                     # per block, per material
best = score.argmax(-1)
keep = (cov >= thresh) | thin                          # enough coverage, or a thin prop in the block
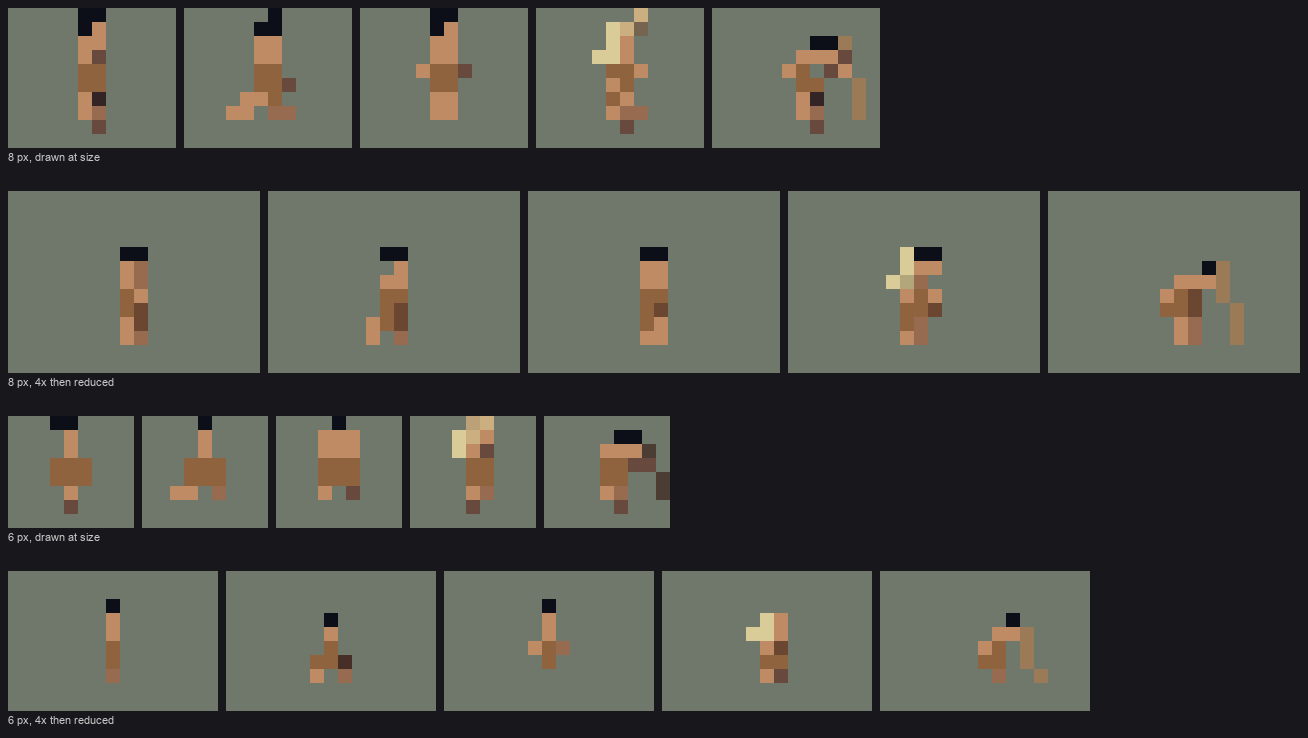
fig. Stand, walk, stand (front), carry, dig at 8 and 6 px: drawn at size with the study's rules (upper row of each pair), rendered 4× and reduced (lower row).
The reduced figures are tidier and emptier:
- the front-view head shrinks to one pixel;
- the skirt loses its value break at the waist;
- the 6 px walker turns into a stick.
The drawn ones carry the rules: a dark head block, a body mass two pixels wide, legs. I kept reduce_idx and sprite_ss in the code for comparison and never used them again. The lesson generalises: at a few pixels, a rule that says what the figure is made of beats any averaging of what it looks like.
Where it falls short
Drawing at size means the figure's shape at 6 px is decided by rules, not by the body, and rules can be wrong in ways averaging never is. For example, a pixel floor inflates a part and the part wins where it shouldn't. Print the part map whenever a small figure looks wrong.